Bowling Ball Videos, Bowling Tips & Coaching Articles, Storm Bowling Ball Videos, Surface & Layouts
Storm Axiom Bowling Ball Layout Drilling Comparison

For this comparison test, I selected three different layouts each with the same pin to PAP distance but varying pin buffer and PSA values. I will find the optimal line with each ball/layout and roll similar lines with them to distinguish each ball’s unique layout characteristics.
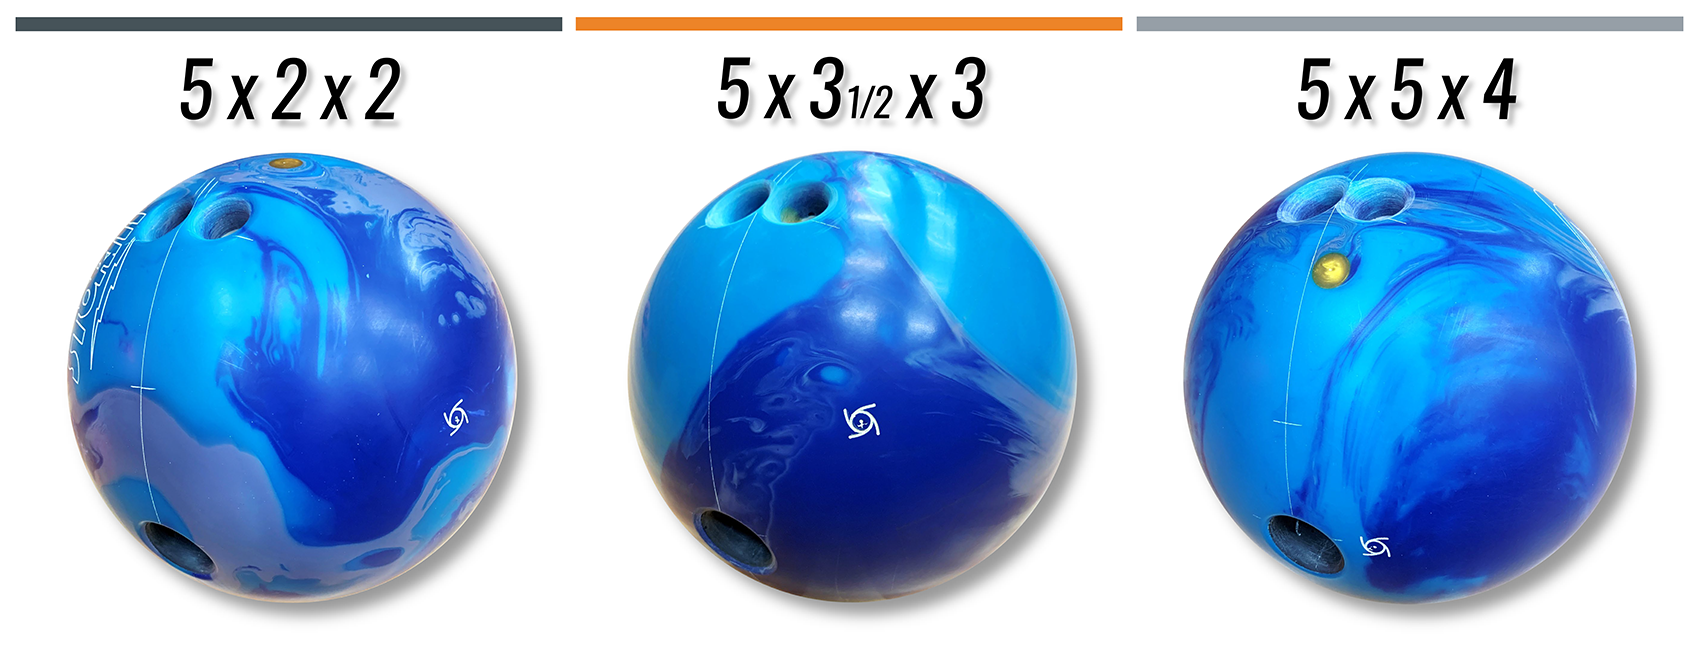 I’ve maintained the pin to PAP distance with each of these layouts but adjusted the pin buffer in 1” increments. The pin to PAP (most influential variable) was held constant at 5” across all three test balls. The CG placement was selected randomly, at best, to better illustrate that static weight sustains little relevance with my style or the conditions I’m bowling on in this test. However, static weight undeniably does matter with “when”, “who”, and “how” variables clearly defined and under certain circumstances, but that’s a topic for a future article.
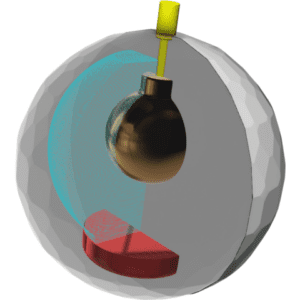
SPINNING A SYMMETRICAL CORE AROUND THE X-AXIS (PIN) RESULTS IN THE SAME OVERALL MASS DISTRIBUTION NO MATTER WHERE THE CG ENDS UP.

The 5 x 5 x 4 layout places the pin directly beneath my ring finger and would all but be referred to as “pin down” at any level in the game. In a brief summation, pin down has historically been known to roll sooner. This conclusion was drawn from the idea that the more static weight was biased towards the thumb caused the ball to rotate off its axis sooner. The antithesis was also widely accepted for pin up balls.
However, the type of technology that commands the contemporary game of today establishes itself on symmetry, asymmetry, and differentials. When static weight was the only ball motion tuning parameter to boost bowling ball performance, it carried a heavier significance. But modern physics dictate that agreement in dimensions, due proportion, and mass arrangement shall have precedence over static weight in bowling ball performance. And because this core has those physics manufactured into it, where the holes are drilled matters more now than ever.
Anytime you introduce a hole into a bowling ball you are raising the RG (radius of gyration) of the bowling ball in that precise spot. When I place holes above and below the pin, I’m greatly affecting the low RG axis of the ball by making the height of the core more like the width. This put the ball’s axis in a high RG orientation and cuts back on overall differential, forcing the ball to roll later rather than sooner and hook less overall. It responds significantly slower to friction, whether it’s to the outside of the lane or at the end of the pattern and blends out extreme transitions between wet and dry. You may have more room for error with a pin down layout as the flare pattern takes longer to finalize and delays the transitions from skid to hook to roll. I prefer playing straighter with larger pin buffers, or when it’s late in the block and there’s little oil on the lane left to find.
 There was only a difference of 1/2° entry angle between these three balls, but over 2 feet of breakpoint distance (front to back) which resulted in either a flush strike or going too high/Brooklyn consistently. Rev dominate bowlers gravitate towards larger buffers due to the lengthened reaction time of the layout. This maximizes their room for error because transition zones with their ball roll are inherently quite short. This gives further credence to the notion that “when” a ball hooks is more important than “how much” a ball hooks.

A pin up 5 x 2 x 2 Axiom sets the pin above my fingers and more to the ring finger side. It was commonly accepted that pin up balls provided more finger weight and delayed the ball’s reaction. As mentioned above, times have changed. Drilling mostly into the high RG axis (Y-axis) of the ball drives the core’s width further away from its height by making it taller. This creates a core height that’s even more different than the width that was manufactured in the ball to begin with. This higher “differential” induces greater torque within the ball and forces it to change direction sooner and more overall. You can visually assess this yourself by inspecting the flare pattern on your pin up ball compared to your pin down ball (assuming they’re similar in dynamics).
Pin up balls typically have a greater core orientation benefit when going through the pins because it will likely be in its final roll phase upon impact. And you’ve heard it all before: a ball that’s rolling into the pins has a higher carry percentage than a ball that’s hooking into the pins. Why? Less deflection. A hooking ball still has a skid element associated to it. A rolling ball doesn’t. But pin up balls can sometimes magnify mistakes because their transition zones are so short. Your window for accuracy is now reduced but is still highly dependent on your speed, rev rate, tilt, and rotation.
I like to utilize short pin buffers when I need the ball to get into a roll sooner, especially on heavier patterns. I also like to use pin up balls with longer pin to PAP distances to stand left and throw right because they’re ready for friction when they encounter it. If I pull it too far inside into the heavier oil it can still get into a roll and carry rather well. But if I miss right it will still recover all those boards traveled and find its way back to the pocket thanks to its lower RG core orientation and higher overall differential.
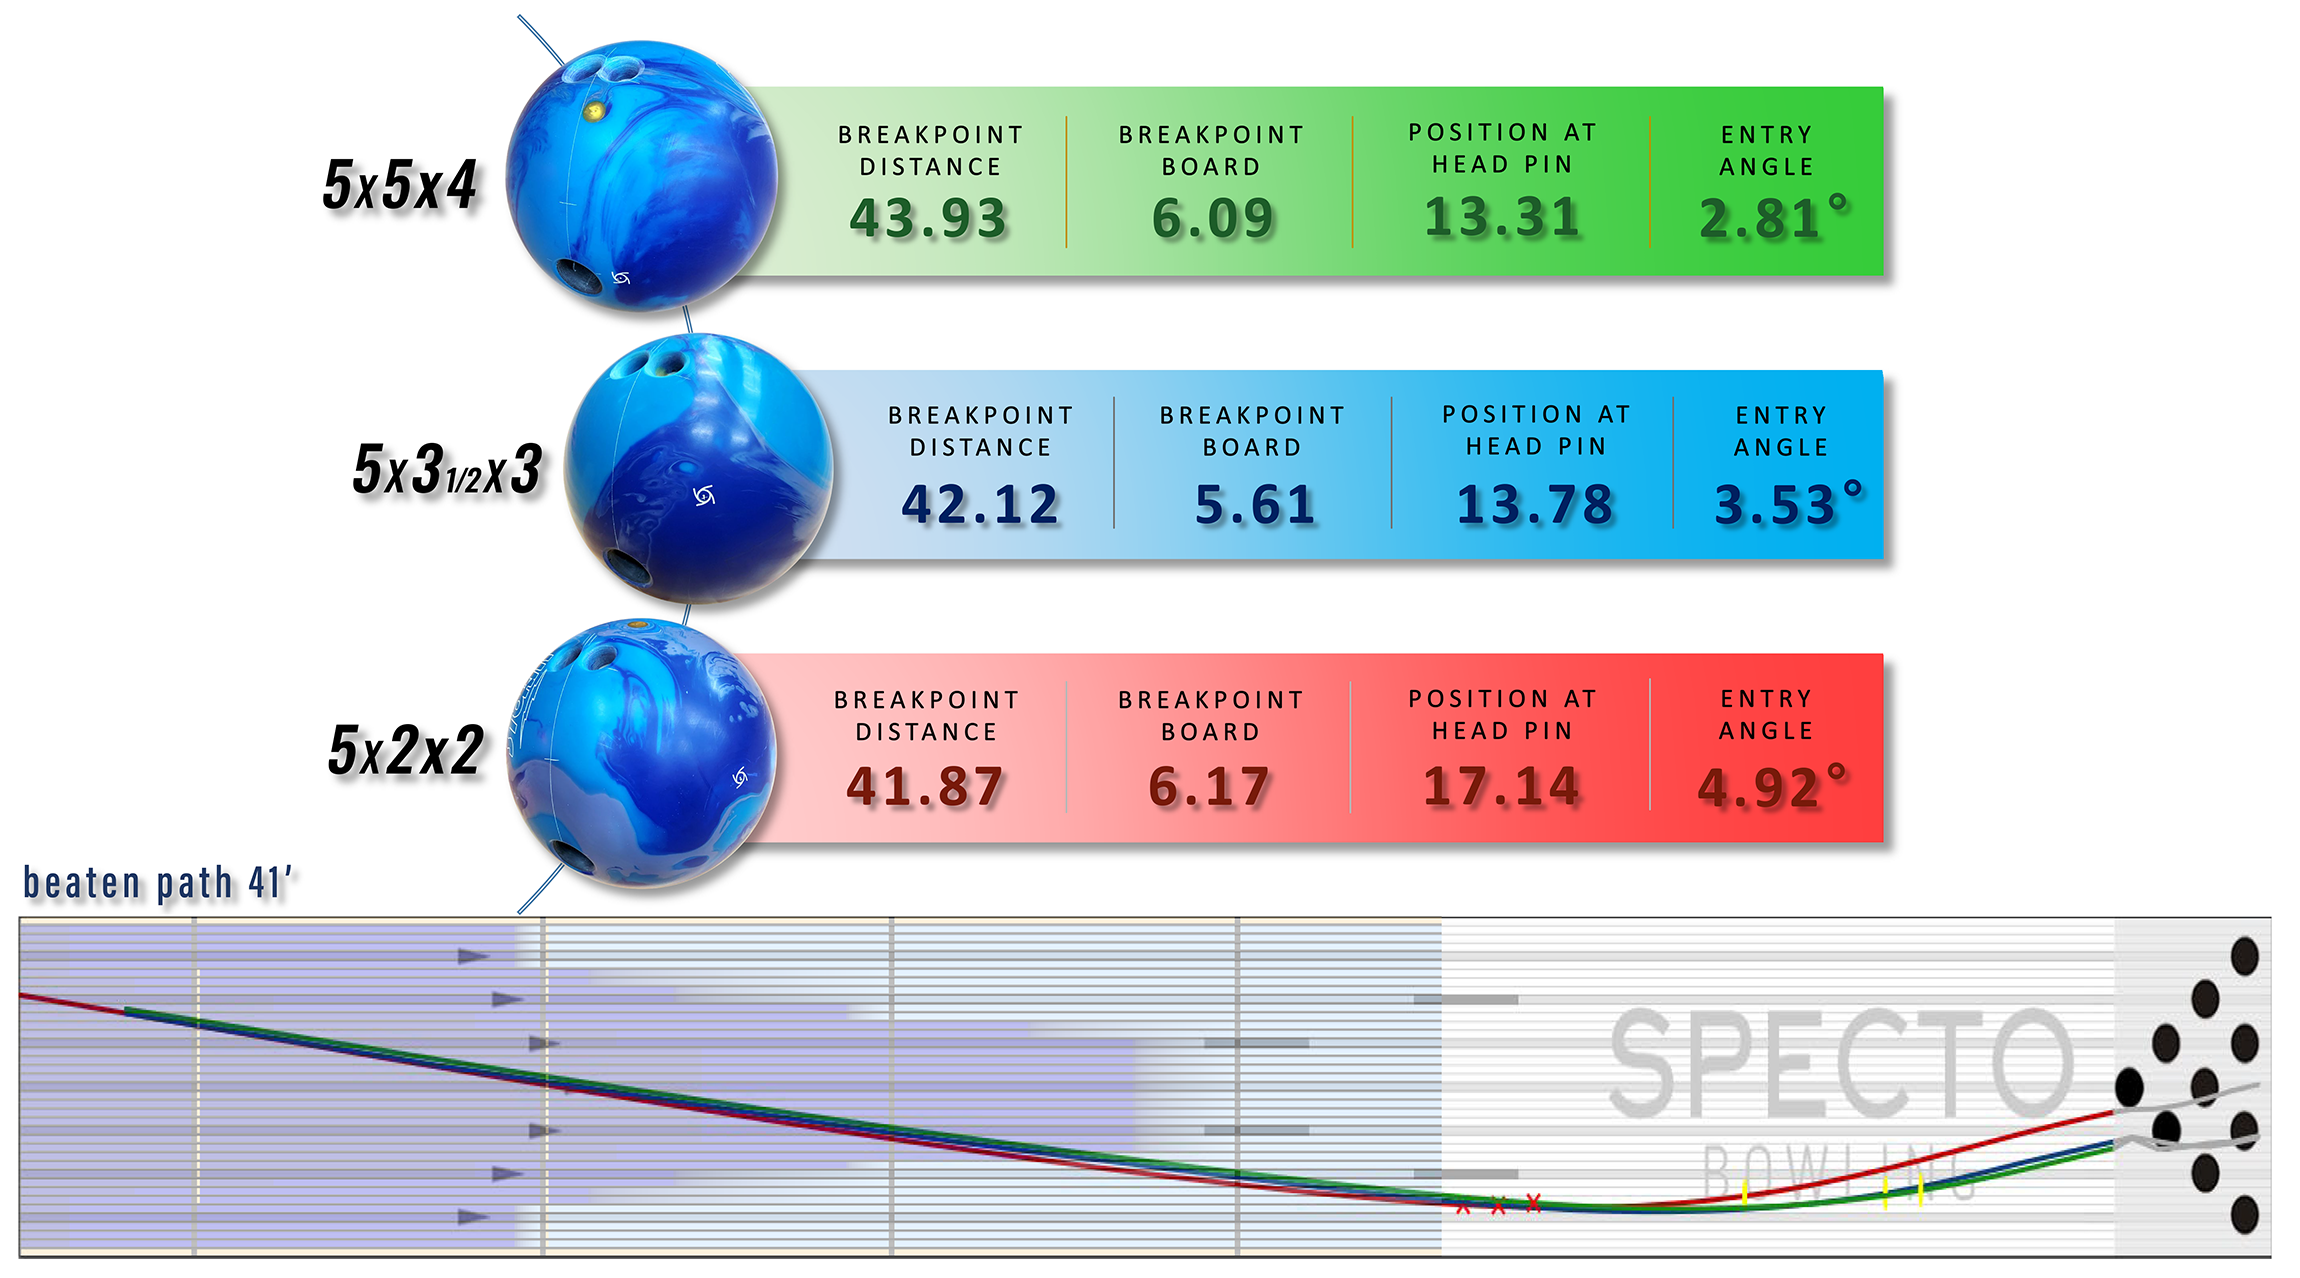 Breakpoint distance relationships for the three balls stayed the same with flare potential playing a crucial role in recovery to the pocket. The balls now have to travel a farther distance to get back to the strike zone so the player has to be cognizant of how much the ball is going to hook. Players with higher axis tilts and higher speeds can benefit from smaller buffers by getting it to tilt off its axis sooner. Pin up balls create a low RG band around the X-axis to help it rotate quicker off its axis to combat the slicker oils of today.
An Axiom drilled with a 5 x 3 ½ x 3 naturally drops the pin in my ring finger. This may look like an “exotic” layout, but in reality it’s as ordinary as the other two. Drilling out the pin is preferred over drilling too close or halfway into it because it helps maintain the integrity of the shell and creates a smaller weak point. This mid-range pin buffer distance maximizes proficiency by using the contours of the core to its advantage. For my ball roll and PAP it places finger holes directly in the X-axis and thumb hole very close to the Y-axis, so they reshape the core more uniformly after drilling. I can get the best of both worlds and have found this layout to be one of the most versatile in my bag. With a subtle change in hand position or speed I can navigate to just about anywhere on the lane with this layout and still get the ball to go through the pins the way I need it to. When deciding the layout of your next ball the pin buffer would surely be the second most important variable of the three right behind pin to PAP distance but in front of the PSA’s location.

Breakpoint distances remained consistent with the entry angle values branching apart more due to the deeper set down. A 3″ buffer can add great versatility to anyone’s bag. It’s beneficial for just about any style of play. The transition it creates from front to back isn’t too fast or too slow. It can also work well on a multitude of patterns. And if it isn’t just right, a quick and simple surface adjustment will get it back on track!
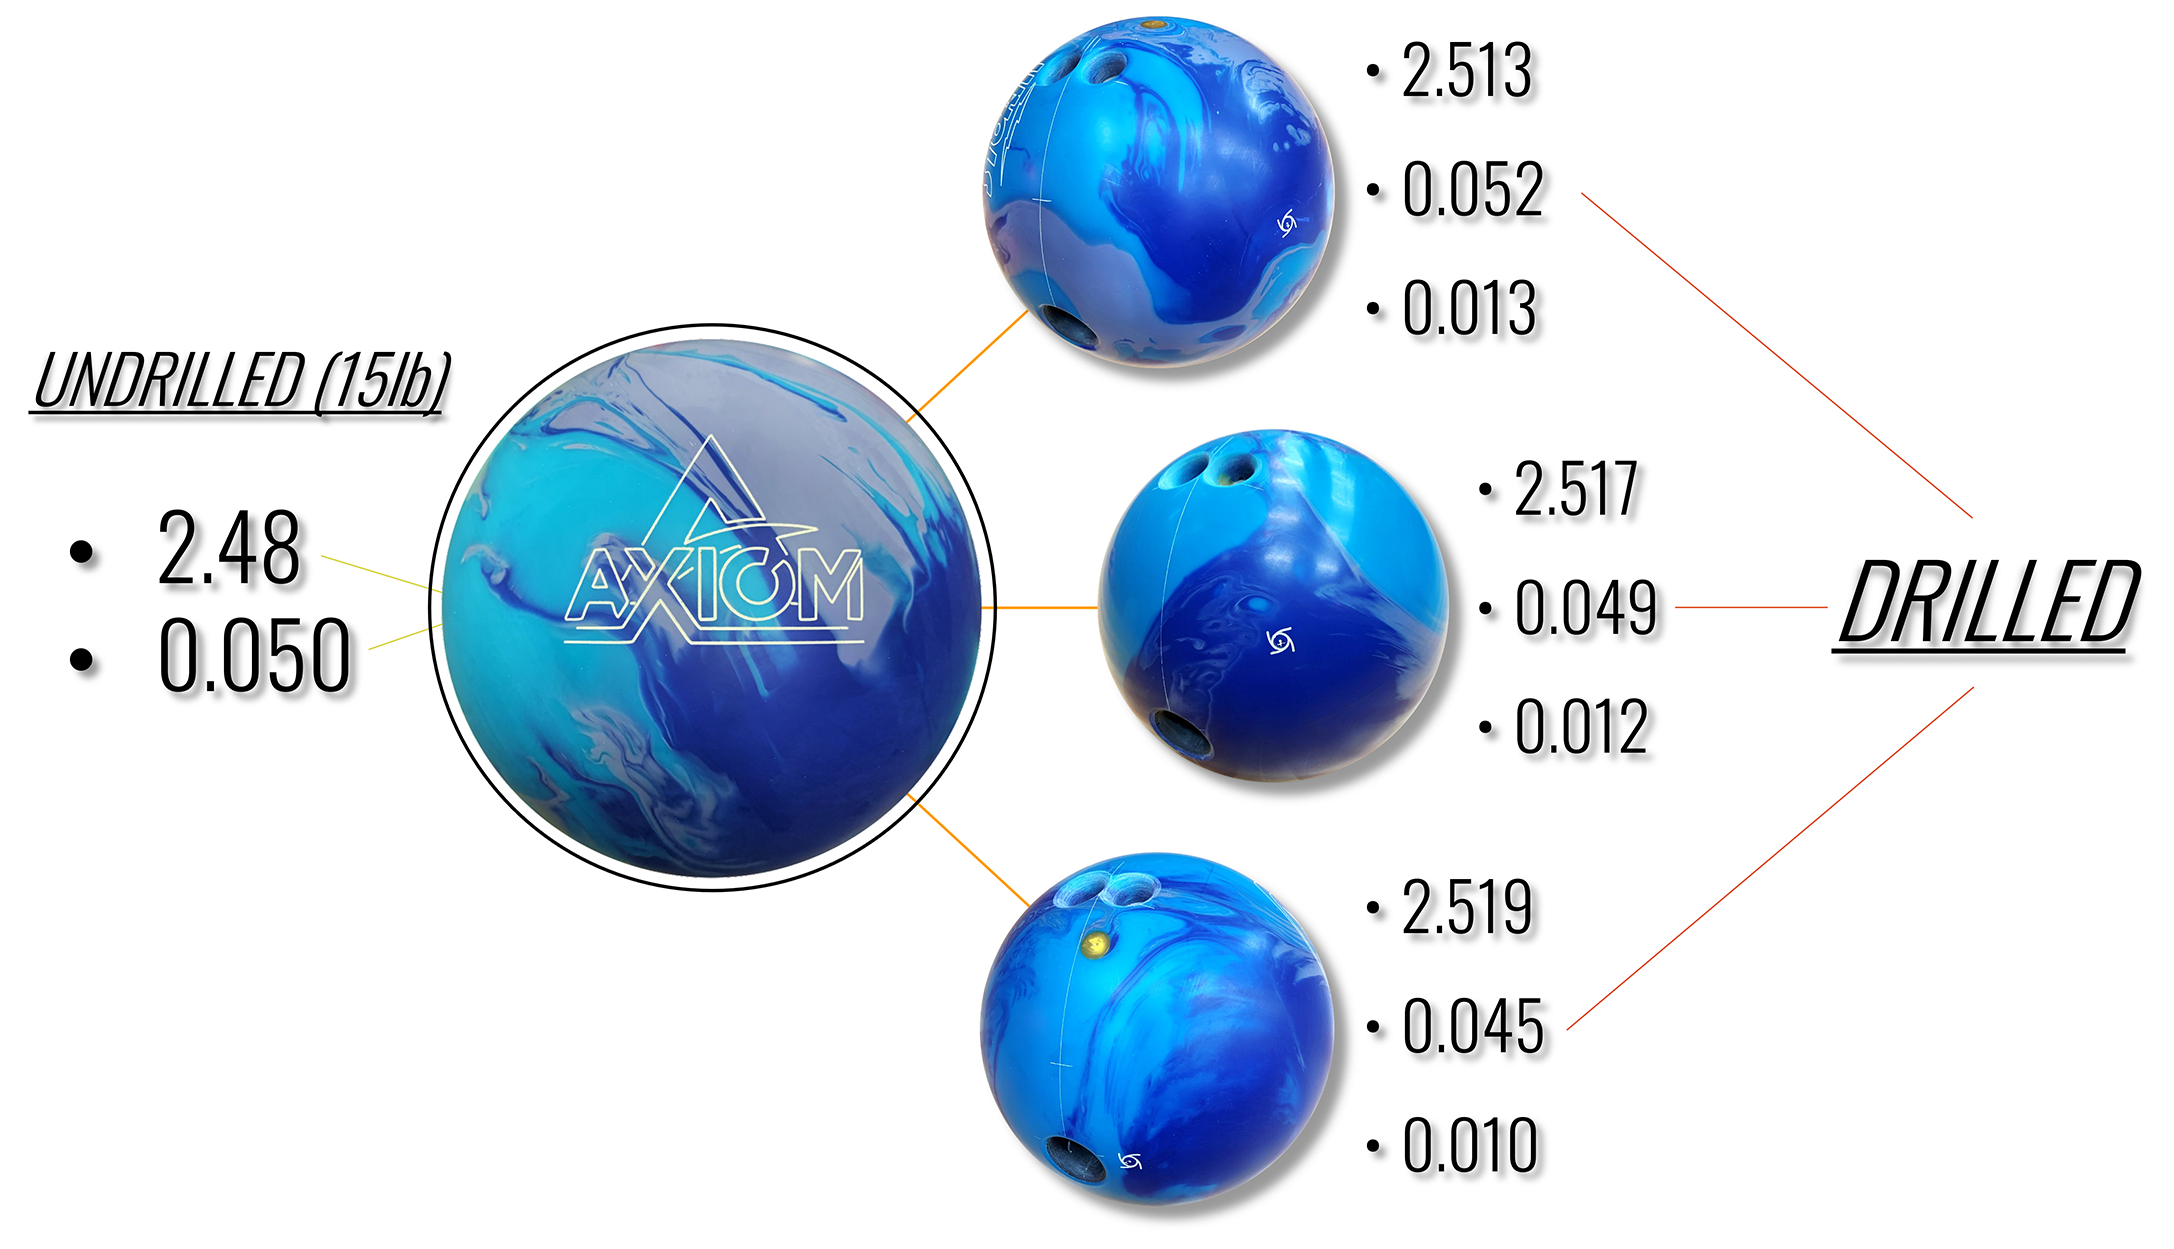
And for all you tech enthusiasts out there, the drilled and undrilled RG analysis for each of the balls is showcased below. Knowing what we know now about RG’s and differentials, it’s logical to justify saying pin up balls hooker sooner and more than pin down balls under similar playing conditions. The smaller the buffer, the quicker the ball gets going forward and you can immediately see it in the video below thanks to the low camera angle. Always remember, it’s your job as the bowler to determine when to use such layouts. There’s a time and place for every ball, every layout.
As mentioned many times before, whenever a hole is introduced to a bowling ball the RG value of the ball rises in that precise spot. Acknowledging that fact, the results from the RG swing test on the three balls aren’t that surprising. The pin up Axiom maintained the lowest drilled RG and highest differential thus, making its breakpoint the earliest. It’s also objectively true in ball dynamics that a symmetrical ball becomes asymmetrical once it’s been drilled into and the PSA positions itself close to the thumb once it’s been drilled. I’ve included the new intermediate differential as well. You can see the pin up Axiom also became the most asymmetrical of the group because we squeezed the Y-axis closer to the X-axis but left the Z-axis alone (no balance hole used). From there, lower pin placements (larger buffers) created higher drilled RG’s and lower total and intermediate differentials. Knowledge is power. Now go use it to your advantage!


