


Bowling How To's & Buyers Guides, Bowling News, Bowling Tips & Coaching Articles, Storm Bowling Ball Videos, Surface & Layouts
Storm | Pin Buffer Layout System For Drilling Bowling Balls – Part 2: PSA-to-PAP Distance
Confusion
The preferred spin axis (PSA) on an asymmetrical ball is one of the most misunderstood topics surrounding bowling ball technology in today’s game. A majority of bowlers don’t realize how important it is and how much more the ball reaction can be fine-tuned when drilling an asymmetrical ball. Before we dive into this topic, it is important that we understand what the PSA is, where it exists on a bowling ball, and why it is there. Let’s take a closer look.

Symmetry
Take a look at Figure 1. It highlights the difference between a symmetrical ball and an asymmetrical ball. Looking at the Stinger™ 2.0 Core on the left, you’ll see that the core can be cut in half any direction through the pin and both sides will be identical. This is essentially the definition of radial symmetry, which the bowling industry calls “symmetric” for short. The Stinger 2.0 Core is a symmetrical core. Symmetrical cores are going to tend to transition slower and smoother than asymmetrical cores because of this evenness from side to side. Looking at the RAD-X™ Core on the right in Figure 1, you’ll notice that the same process of symmetrically cutting the core in half around the pin cannot be done. One side of the core is skinnier than the other side. This creates a preferred spin axis and makes the core asymmetrical in shape. Asymmetrical cores are going to tend to transition faster and change direction more violently than symmetrical cores. This is primarily because of the added amount of imbalance caused by the PSA.
Intermediate Differential
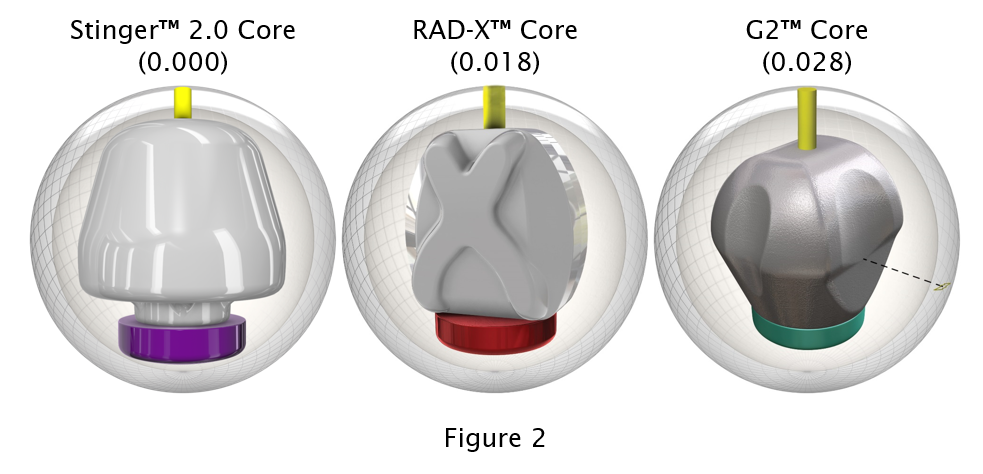
Radius of gyration (RG) and total differential are specs that are provided by manufacturers to help pro shops and consumers understand the core technology inside the bowling ball. Intermediate differential is another specification that is only listed on asymmetrical balls. Intermediate differential by definition is the difference between the y-axis and z-axis of the bowling ball. I know this can be a bit confusing, but bear with me for now. Look at Figure 2. You’ll see an image of three different bowling ball cores. The first image is of the Stinger 2.0 Core, the second is of the RAD-X Core, and the third is of the G2™ Core. I’ve included the intermediate differential on each of the cores to help show their differences. Intermediate differential only exists on asymmetrical cores. It doesn’t exist on a symmetrical core because the width of the core is the same all the way around the ball at 6 ¾” from the pin. In other words, there is no difference from the y-axis to the z-axis. Take a look at the Stinger Core. It is the same width all the way around making it symmetrical. This makes the intermediate differential 0.000, which is the primary reason that it is not listed with other manufacturer specifications. Next in line is the RAD-X Core. You’ll see that there is a moderate amount of intermediate differential because it is skinnier on one side of the core compared to the other side. The skinnier this side is in relation to the other, the more intermediate differential the ball is going to have. The intermediate differential of the RAD-X Core is 0.018. Finally, the G2 Core has the most intermediate differential of any ball that Storm has ever created at 0.028.
The higher the number, the stronger the PSA is and the more influence it is going to have when placed in a strong position.
It’s important to note that it is nearly impossible to see this with the naked eye. We are talking extremely small numbers, but they have a large effect on ball reaction. This is why it may be difficult to see that the G2 Core is skinnier than the RAD-X Core. Keep in mind this intermediate differential is only going to have an influence if it is placed in a strong position relative to the PAP. Placing it in a weaker position is going to reduce the impact it will have on ball reaction. These numbers are taken from 15lb bowling balls. Keep in mind core numbers can all change depending on what weight you throw. Be sure to make sure you’re looking at the correct weight when looking at these numbers.
Understanding the PSA
Any time that there is the presence of a PSA, it is always going to be the preferred axis for the ball to rotate around when energy is applied to the ball. In other words, the ball will always orient itself and rotate around this axis because it is balanced in this position. The laws of physics dictate this happening. Depending on where the PSA is placed in relation to the bowler’s positive axis point, different reactions can occur. How much of a difference you might see in reaction depends on the amount of intermediate differential in the PSA. In other words, the intermediate differential is the indication of how strong the PSA is on the undrilled ball. The higher the intermediate differential, the stronger the PSA. There is not a strongly defined PSA on symmetrical balls because there isn’t a significant amount of intermediate differential. Keep in mind all of the other variables of ball motion have an effect here as well. As I’ve stated in previous articles, we are simply taking a look at this one variable and holding all the others constant. Take a look at a few generalized examples below and see what they look like when put in motion.
Longer PSA-to-PAP Distances
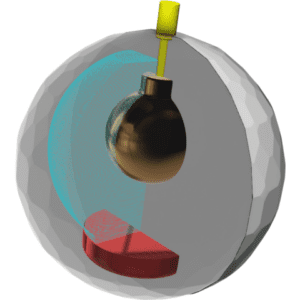
 PSA-to-PAP distances of 4 ½” or more are going to result in the PSA being oriented closer to a stable position at the moment of release. Take a look at Figure 3. The picture shows the rotation of the core with the PSA placed 6 ¾” away from the PAP. This is an extreme example. You’ll see that this puts PSA in a stable position as the ball is released. This is going to reduce the overall track flare and cause the ball to transition slower as it travels down the lane. This is going to make the ball get through the front part of the lane cleaner, and be much smoother as it releases energy down lane. Keep in mind, these balls show 0 degrees of both axis tilt and axis rotation. They also show a Pin-to-PAP distance of 6 ¾”. I’ve chosen these because it makes the differences in PSA-to-PAP distance the easiest to see visually. Additionally, the balls do not have holes. When you add in tilt, rotation, layout, and size of the holes, the actual orientation can get extremely complicated to show visually. We are keeping these examples extremely simple so it’s easy to see the difference in orientation upon release.
Shorter PSA-to-PAP Distances
 PSA-to-PAP distances of 2 ½” or less are once again going to result in the PSA being oriented in a more stable position at the moment of release. This is similar, but not to be confused with the longer distances. It is similar to Pin-to-PAP distances. When using shorter PSA-to-PAP distances, the PSA is going to line up extremely early on the lane as it is nearly lined up already at the moment of release just as a short Pin-to-PAP distance nearly balances the core at the moment of release. Take a look at Figure 4. The picture shows the rotation of the core with the PSA placed 0” away from the PAP. You’ll see when the ball is in rotation that the PSA is completely lined up at the moment of release. It doesn’t have to migrate to be in a stable position. A ball with a shorter PSA-to-PAP distance will want to line up quickly and stabilize early as the ball is traveling down the lane. As I mentioned at the end of the previous paragraph, PSA-to-PAP distance is relative to all of the other factors of ball motion. They all work together to create the desired ball motion.
Stronger PSA-to-PAP Distances
 PSA-to-PAP distances longer than 2 ½” but shorter than 4 ½” are going to result in the PSA being oriented in a strong position at the moment of release. It will be in a very unstable position and it will want to migrate to a more stable position as it transitions down the lane. Take a look at Figure 5. The picture shows the rotation of the core with the PSA placed 3 ⅜” away from the PAP. You can see how unstable this is even with the Pin-to-PAP distance being 6 ¾”. On a side note, this shows you why an asymmetrical ball will flare more with longer Pin-to-PAP distances if the PSA is placed in a strong position. There is still imbalance present in the PSA that wouldn’t be present on a symmetrical ball. With a stronger PSA-to-PAP distance, the ball is going to transition quickly, flare more, and react stronger as it rolls down the lane. This is a great example to show you how intermediate differential affects the imbalance. The higher the intermediate differential is, the more effect it is going to have when placed in this unstable position. You can also see why it is only relevant when placed in a stronger position. In the previous two examples, the PSA begins in such a stable position that the intermediate differential is largely irrelevant. This is the same relationship as total differential and Pin-to-PAP distance. It doesn’t matter if the ball has 0.060 differential if the Pin-to-PAP distance is 0”. The core is balanced upon release and isn’t going to flare as it travels down the lane.

Symmetrical Misconception
Most players believe that changing the PSA-to-PAP distance on a symmetrical ball will create a significant difference in ball reaction. When changing the PSA-to-PAP distance on a symmetrical, all you are really doing is rotating changing the position of the center of gravity. Figure 6 shows a classic example of two bowling balls with identical Pin-to-PAP distances and pin buffers. The only difference is the PSA-to-PAP distance. We have used a 2” PSA-to-PAP distance on the ball on the left and 6” PSA-to-PAP distance on the ball on the right. Before looking at the next figure, imagine what the difference in core position looks like.


Now take a look at Figure 7.1. You’ll see that no matter how much we rotate the center of gravity, the position of the core stays in relatively the same overall position because the Pin-to-PAP and pin buffer distances have remained unchanged on the symmetrical. Imagine screwing an incandescent light bulb into a socket. No matter how much you rotate it, the orientation of the light bulb does not change because it is symmetrical in shape. In a bowling ball, the only difference you will see is in the static weights of the ball, which we already know from previous articles are not very influential to today’s ball motion. Take a look at Figure 7.2. You’ll see that there is a difference in core position when rotating it because of the asymmetrical shape. The PSA moves a significant amount and can be placed in a certain position to manipulate ball reaction. Hopefully these visual aids really helps you see what difference there is when comparing the PSA-to-PAP distance on a symmetrical to an asymmetrical.

Test Data
I’ve provided some data using Specto by Kegel® to visually help you see the difference of changing the PSA-to-PAP distance in a symmetrical compared to an asymmetrical. There were a total of 4 balls tested in this experiment, 2 Sure Lock bowling balls and 2 Torrent bowling balls. Figure 8 shows the four different balls that were tested, the layouts on those balls, the migration paths, the top weight, and the after-drilling total weight.

Looking at the data, Figure 9.1 is showing the ball paths of the two different Sure Locks as they were thrown down the lane. You’ll notice at first glance that the blue line (5 x 2 x 2) sees the lane earlier. It was launched with slightly more angle and still didn’t get as far right at the break point. The red line (5 x 6 x 2) stays on a straight line path longer, gets farther right, and recovers more down lane even though it was launched with slightly less angle. You can see that the true break point distance is a few feet farther down the lane for the red line compared to the blue line. Figure 9.2 is showing the ball paths of the two different Torrents as they were thrown down the lane. You’ll see that there is nearly no difference in the two shots. They were released within ½ of a board of each other at the exact same launch angle and ended up within ½ of a board of each other at the pins with the overall shape being nearly exactly the same.
All of these shots were kept within an extremely tight tolerance so that the difference you see in the plots is purely from the difference in the balls. Most will look at the graph and say, “Oh, they aren’t that different.” Looking closely at some of the data will show you some subtle front to back changes in ball motion. Reading your ball motion front to back is what separates the professionals from the amateurs. The primary reason for the difference between the Sure Lock and Torrent data is the PSA. You can really see how much influence the 0.018 of undrilled intermediate differential has on ball motion. Keep in mind that both of these Sure Locks are utilizing relatively “weak” PSA positions of 2″ and 6″. If I would’ve used a stronger PSA position, we would see an even bigger difference.
Analyzing Further
You can see that the 5 x 2 x 2 Sure Lock sees the lane a few feet sooner. If you look at the Torrent data, you’ll see that the lines are overlapping. There is so little difference, it is not significant to the ball motion. The primary difference we see is caused by the difference in static weights. Might be a bit surprising to some that a ball with nearly 2 ounces of positive side weight reacts nearly identical to a ball with ½ an ounce of negative side weight. When throwing a 15lb bowling ball, there are approximately 240 ounces of total weight in the ball. 1 ounce of positive or negative side weight is not going to have a significant influence on the overall motion of the ball when there is such a large imbalanced core inside creating large flare patterns. The position of the core along with coverstock/surface preparation are going to have much more influence.
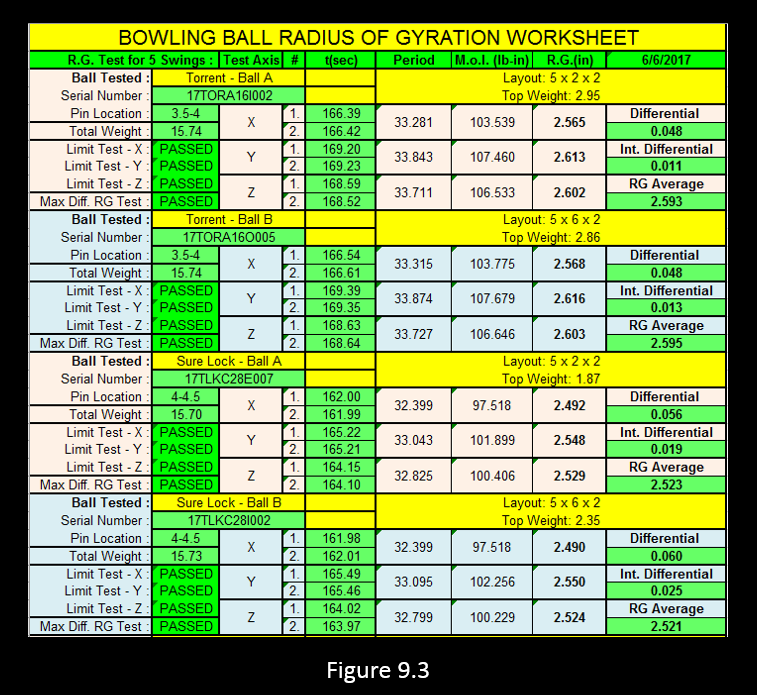
For those of you who really want to get technical, Figure 9.3 is a swing sheet for each of the balls that were tested in this experiment. I’ll highlight some of the major differences between the two. Look at the data from the Torrents. You’ll see the RG on both is 2.56, the differential is 0.048, and the intermediate after drilling is relatively close. All of this information is why you don’t see much difference in these two balls going down the lane. Go back to figure 8 and notice the migration paths of the two Torrents. The yellow dot on the right is the initial axis and the red dot on the left is the final axis the ball migrates to as it travels down the lane. You’ll notice they go in exactly the same direction and flare the exact same amount. This is because after drilling, the PSA ends up in the thumb hole on both of the balls since there wasn’t a strong PSA present to begin with. Since the PSA is in the exact same position on both of the drilled balls, along with the Pin-to-PAP distance and pin buffer, the balls are going to flare the exact same way. This really shows how insignificant static weights are to ball reaction in today’s game. The 5 x 2 x 2 Torrent has 2 ounces of positive side weight, where the 5 x 6 x 2 has 3/8 of an ounce of negative side weight. You can see this has nearly no impact on the ball path in Figure 9.2.
Now take a look at the Sure Locks. You’ll see the RG on both is 2.49, but that’s where the similarities end. You’ll see the 5 x 2 x 2 has 0.056 differential and 0.019 intermediate, where the 5 x 6 x 2 has 0.060 differential and 0.025 intermediate. We have significantly changed some of these important numbers, which is why we see a slight difference in ball reaction. Keep in mind, both of these PSA positions tested are considered to be in a relatively “weak” position. If we split the difference and had a 3rd ball with a PSA-to-PAP distance of 4″, we would see even more significant changes to the ball reaction. This was simply to show you how much earlier the PSA lines up with closer distances, and how much later it lines up with longer distances. Even in these relatively “weak” positions, they have more effect than any position does on a symmetrical. Now take a look at the migration paths of the two Sure Locks in Figure 8. You’ll see when the PSA is pushed to the right, it forces the migration down. When the PSA is pushed to the left, it forces the migration up. This is because the migration path is always going to want to stay on the same RG plane that it began on. In other words, it’s going to follow the path of least resistance. Since there is already a strongly defined PSA present on the Sure Locks, drilling a thumb hole doesn’t pull the after-drilling PSA into the thumb hole. It will settle somewhere between the two.
 Think of it like a tug of war to get balanced. Intermediate differential is the force pulling one way and the mass taken out from drilling is pulling the other way. I’ve created one final image to help explain this. Figure 9.4 shows the after-drilling position of the PSA on the 5 x 2 x 2 Sure Lock. You’ll see that the thumb pulled it away from its original position, but not all the way to the thumb as it did in the symmetrical. The intermediate differential from the PSA pulled it back and it settled between the two in a balanced position. The larger and deeper the holes are drilled, the more it will pull the after-drilling PSA towards them. Tying in with my article about balance holes, you can see how this after-drilling position of the PSA can be manipulated even more depending on the extra hole’s distance from both the pin and the PSA. Asymmetrical bowling balls are truly unique in the amount of fine-tuning you can do to the reaction.
Final Thoughts
This article was a bit difficult to keep light when the topic is more complicated. Reading over it more than once will definitely help you understand this complicated topic a bit more. I hope a few of you have made it to this point and feel like you learned something. Even if everything wasn’t completely understood, hopefully it opened your eyes to the complexity of ball motion and how much really goes into it. If anything was unclear or you’re looking for more information, please comment below or reach out to me directly. I’ll do my best to help in any way I can. Learning more about the PSA and its effect on ball motion will significantly help you appreciate the difference an asymmetrical ball can give you. I’m sure most readers will find the test results comparing the symmetrical versus asymmetrical differences to be the biggest takeaway from this article. As I’ve said in previous articles, the laws of physics can’t be broken. Understanding more about what causes your ball to transition as it goes down the lane will make you a more powerful and versatile bowler in the long run. A smarter bowler can definitely beat a more talented bowler. Putting in some extra time to learn what is happening might just be the difference in your next match. Thanks for reading!
Lorem ipsum dolor sit amet...


more bowling articles you may enjoy
Radical Outer Limits Solid Bowling Ball Review & Analysis Guide
Radical Outer Limits Solid: Unleash Unmatched Hook Potential on Heavy Oil The Radical Outer Limits [...]
Jan
Ebonite Crusher Hybrid Bowling Ball Review & Analysis Guide
Ebonite Crusher Hybrid Bowling Ball: Length and Explosive Backend for Maximum Strikes The Ebonite Crusher [...]
Jan
DV8 TROUBLE MAKER SOLID Bowling Ball Review & Analysis Guide
DV8 Trouble Maker Solid: Maximum Hook and Control for No-Thumb Bowling Styles The DV8 Trouble [...]
Jan

Hammer 3-D Offset Assault Bowling Ball Review & Analysis Guide
Hammer 3-D Offset Assault: Strength, Versatility, and Aggressive Hook for Medium-Heavy Oil The Hammer 3-D [...]
Jan

Motiv Jackal Onyx Bowling Ball Review & Analysis Guide
Motiv Jackal Onyx: Unleash the Claws of Heavy Oil Domination The Motiv Jackal Onyx is [...]
Jan
900 Global Zen 25 Bowling Ball Review & Analysis Guide
900 Global Zen 25: A Legacy Reimagined for 2025 The 900 Global Zen 25 bowling [...]
Jan
Storm Level Bowling Ball Review & Analysis Guide
Storm Level Bowling Ball: Experience Bowling’s Future Developed in Storm‘s cutting-edge lab, the Level bowling [...]
Jan
Hammer Black Widow Mania Bowling Ball Review & Analysis Guide
Hammer Black Widow Mania: Unleash Unmatched Length and Power on the Lanes The Hammer Black [...]
1 Comments
Jan


I went to a scratch tourney lately & the pattern was don carter 39..I knew it would be a tough, slicker shot so I took my katana pearl (the gray katana) drilled to roll early/hook early. It wasn’t the right ball for sure & I should have sanded it to 500 grit or even lower. I throw around 15-16mph & have & about 235rpm, so down & in is my game. So for those slicker conditions, I take it I need a dull, asymmetrical, highest psa, highest differential, & highest RG as possible right? And I think drilling up a dull ball to roll/hook early would be better than a pearl or shiny 500 grit sanded ball correct? What balls out there should I look at to get…& is there a website that I can go look at all the balls of the past & present & look at the stats of any balls? Thank you