Bowling Ball Videos, Bowling Tips & Coaching Articles, Storm Bowling Ball Videos
Storm Parallax Bowling Ball Drilling & Layout Comparison – Pin to PAP

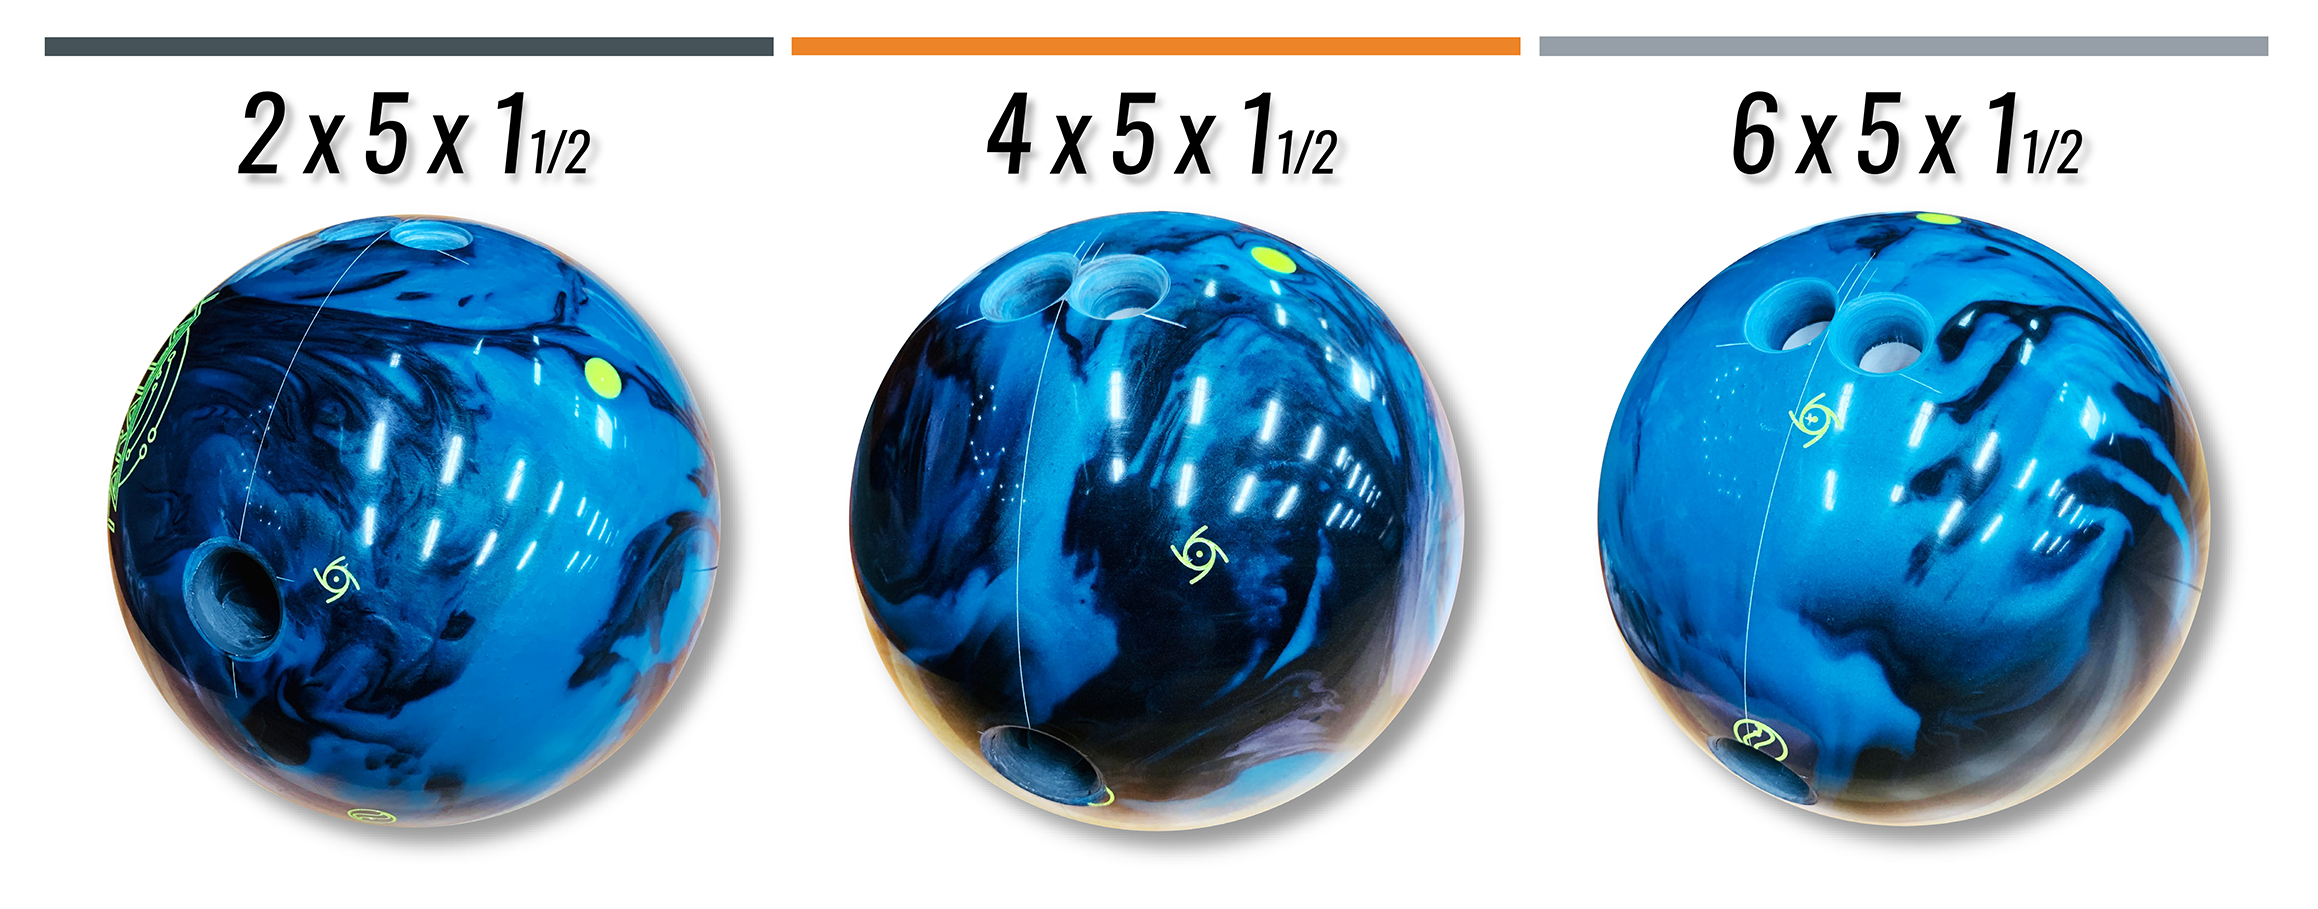
For this comparison test, I selected three different layouts each with the same pin buffer and PSA values but differing pin-to-PAP distances. I will find the optimal line with each ball/layout and roll similar lines with them to distinguish each ball’s unique layout characteristics.
The pin-to-PAP is unquestionably the most influential variable in the layout selection process. It’s immensely important to not only look at the innate characteristics built into the balls themselves, but the layouts, most specifically the pin-to-PAP distance, as well. For an in-depth analysis of what pin-to-PAP distances represent in bowling ball layout application, be sure to check out Alex Hoskins’ thorough column on the subject here.
 I’ve maintained the pin buffer and PSA radii with each of these layouts but adjusted the pin-to-PAP separation across the test balls in 2” increments.
BOWLER STATS:
Launch Speed: 18mph
RPM: 480
Tilt: 6°
Rotation: 45°
Layouts Used for Test: 2 x 5 x 1.5 (30° x 2 x 50°), 4 x 5 x 1.5 (60° x 4 x 25°), 6 x 5 x 1.5 (65° x 6 x 20°)
Surface Used on All Balls: 1500-grit Polished
Oil Patterns: 1.) Broadway V2, 37′, 4.77:1, 26.45 mL 2.) Tungsten, 39′, 6.25:1, 25.60 mL 3.) Beaten Path, 41’, 4.04:1, 24.25 mL
The 2 x 5 x 1.5 layout is an option for players looking for stability. When the patterns are short without much hold and urethane isn’t an option, shorter pin-to-PAP distances become the go-to choice. In this instance, the Aeroflo Core is almost completely laid on its side which puts it in a lower RG orientation. The lower the RG orientation, the less resistant the ball will be to changing direction down lane. This type of layout rolls early and smooths out the breakpoint shape; smoothness equals predictability here. The 2 x 5 x 1.5 shined on the shorter pattern, naturally. At just 37′ and a 4.77:1 ratio, Kegel’s Broadway V2 is short with not much hold. The 5″ PSA-to-PAP distance ensures sufficient entry angle and the 1.5″ pin buffer provides ample roll through the pins, but because it’s still a very stable overall core position, this layout may struggle on lengthier patterns. But if urethane is not your “thing”, then consider a shorter pin-to-PAP layout to help control those more compact patterns when the ball tries to dart sideways off the breakpoint.

At just over 4° of entry angle, the short pin was able to control the pocket much better than the other two test balls despite being thrown at the same set down and launch angle. The longer pins simply created too much flare and volatility which made it problematic in the effort to keep them on the right side of the headpin on this short, flatter pattern. Instability in core orientation is what makes a ball hook in the first place, but knowing when and where to use such flare potential remains the bowler’s responsibility to determine.
A 4 x 5 x 1.5 Parallax is a versatile layout that provides a player whose speed and rev rate match an all-around functional ball able to be used on a variety of conditions. On the medium 39′ Tungsten pattern, this layout shines. With a subtle change in hand position or speed I can navigate to just about anywhere on the lane with this layout and still get the ball to go through the pins the way I need it to. At 4″ from the PAP, this pin distance puts the core in a position that’s suitable for most house and challenge conditions. It truly is the best of both worlds connecting early roll in company with backend entry angle. The location of the pin falls between a high-RG and low-RG axis orientation which is considerably unstable. Since the core is wobbling vigorously in this position when rolled, this type of setup yields a dependable motion in the midlane which can be useful in many different circumstances. One can avoid getting caught up in a sudden, unforeseen transition because of this layout’s ability to read the midlane and blend out the end of the pattern.

Consistent with the shorter pattern, the 4 x 5 x 1.5 layout shaped an entry angle that fell evenly between the long and short pin test balls. On a middle-lengthed pattern such as Tungsten, I could maneuver left or right and still be in the pocket with a subtle hand position or speed change. The 2″ pin and 6″ pin were either too soft or to sharp respectively on entry and required a complete zone change in order to get back to the 1-3.
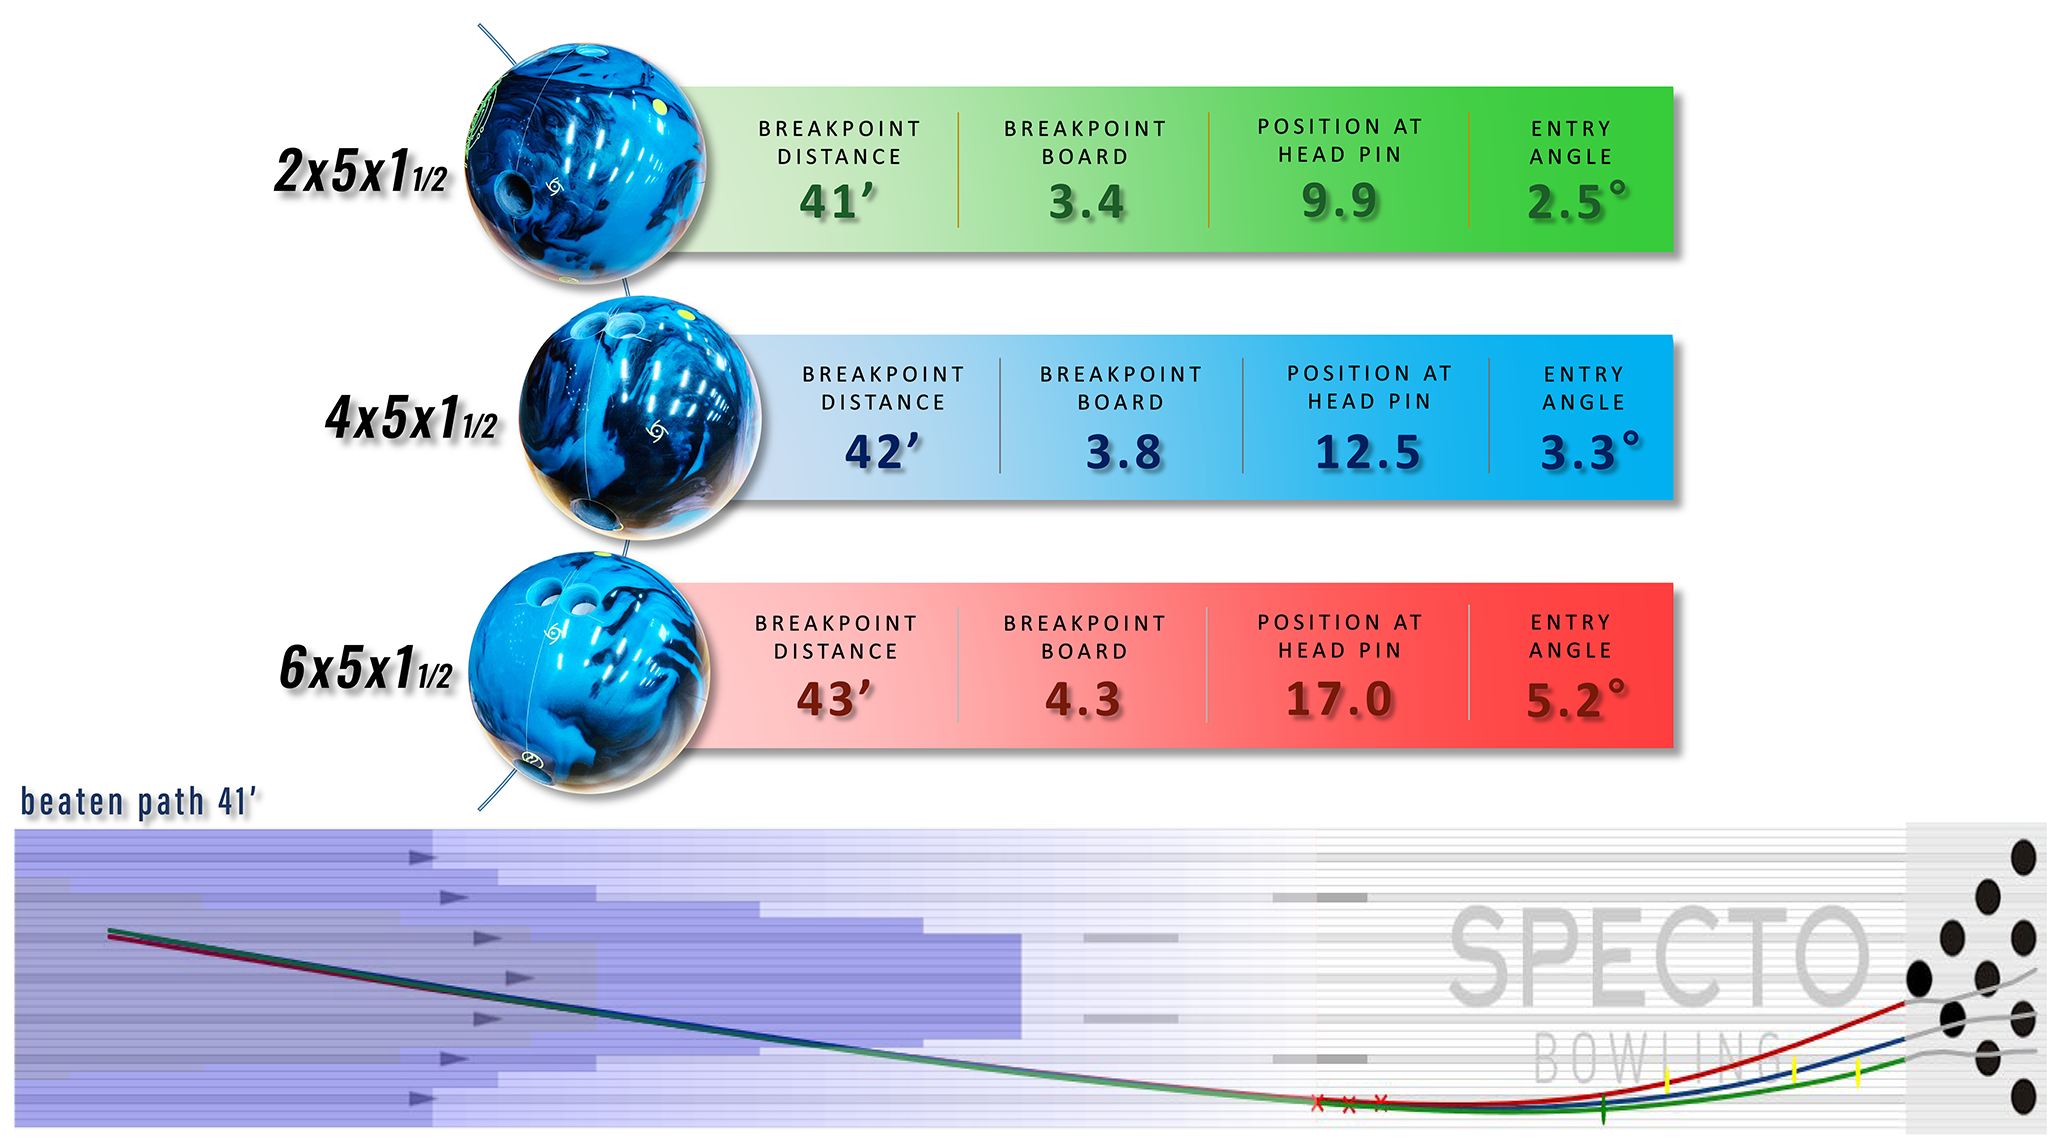
An Parallax drilled with a 6 x 5 x 1.5 creates some serious entry angle. On any pattern, any line, it produced the greatest amount of corner to the pocket. In layouts such as this, there is a very specific time and place they should be used. When the pin is 6″ from the PAP, the core is stood up on end internally and in a stable, high RG state. This results in the ball focusing its efforts in the later part of the lane since it is tumbling more. When a ball like this is in a higher RG posture, it will be more resistant to changing direction as it rolls down the lane. Longer pin-to-PAP values raise the RG and encourage a slower transition with a beeline shape through the first 2/3 of lane. Because of this, you’ll notice more change of direction down lane. For this test I went with the 41′ Beaten Path to show just how vast the differences are in these three layouts. The ideal time I would use a 6″ pin layout is when the oil is depleted rather than freshly dressed. This is because the ball isn’t slowing down as quickly. With every ball, every throw, energy is lost the moment it leaves the bowler’s hand. Other factors that contribute to how quickly a ball slows down include surface roughness of the coverstock and lane materials, but this test is solely looking at core properties. When there’s a lot of friction on the lanes forcing the ball to slow down too quickly, a longer pin-to-PAP layout can help combat those conditions because the core is allowing the roll phase to happen closer to the pins.

When the pattern is shorter with more friction for balls to react on, everything tends to hook at same spot. How much it hooks is dependent on things like core strength, layout, surface, etc. On this longer test pattern, the differences in the three balls became even more evident with breakpoint distances and entry angles in line with exactly what you would expect from such layouts. The 6″ pin had the latest breakpoint and the most angle, with the 4″ and 2″ falling directly in line behind the former.
Here’s the drilled and un-drilled RG analysis for each of the balls is showcased below. Based on the above ball motion breakdowns on the test patterns, it’s understandable why the 6″ pin is the most dynamic of the lot. It has the highest combined differential (total and intermediate). The 2″ test ball’s total differential was comparable to the other two balls, but its extremely stable core position keeps the aggression in check. The 4″ test ball’s drilled RG turned out exactly as expected: precisely between the 2″ and 6″. If I was only allowed to choose one ball for a tournament, it would be the 4 x 5 x 1.5 by virtue of it being the most versatile layout of the three. Always remember, it’s your job as the bowler to determine when and where to use such layouts. There’s a time and place for every ball, every layout.

As mentioned many times before, whenever a hole is introduced to a bowling ball the RG value of the ball rises in that precise spot. Acknowledging that fact, the results from the RG swing test on the three balls aren’t that surprising. The pin up Parallax maintained the lowest drilled RG and highest differential thus, making it the most aggressive of the three. It’s also objectively true in ball dynamics that an asymmetrical ball becomes even more asymmetrical if the thumb placement is closer to the PSA. And since balance holes are now a thing of the past, being it’s important to be mindful and receptive of where the holes may end up in relation to your gripping holes.
KNOWLEDGE ISN’T POWER UNTIL IT IS APPLIED. NOW GO APPLY IT!
:


