SHOP ALL BOWLING BALLS

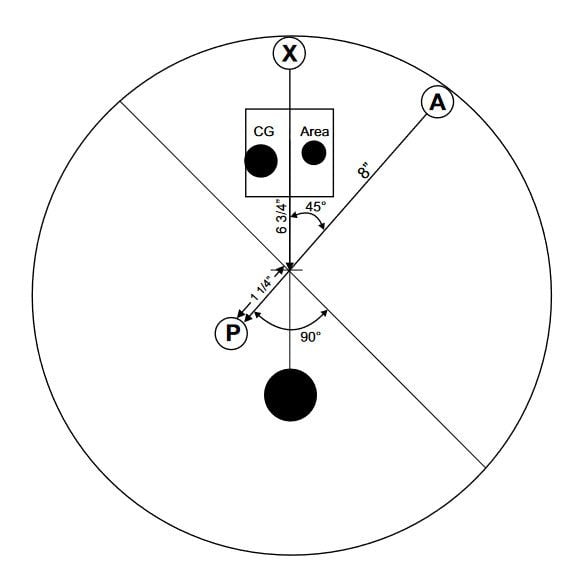
On this page we will cover the asymmetric and symmetric Brunswick bowling ball drill sheets. It is important to remember that your positive axis point (PAP) may differ from the one used below for illustrations.
When your pro shop professional uses your PAP the images below may look a little different when applied to your new Brunswick bowling ball.
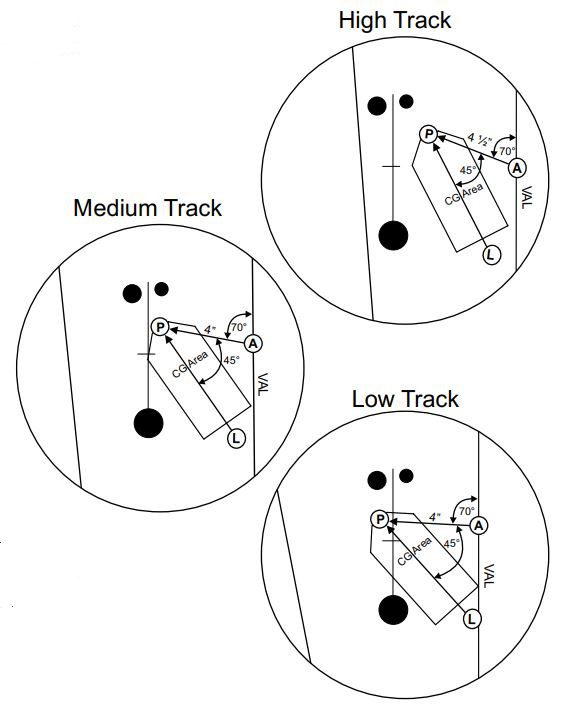
Best pin out distance to use: 0”– 3 ½”
• Locator pin set at 45 degrees
• Pin below fingers (VAL angle 70 degrees)
• Rev’s up strong for maximum hook with a continuous back-end.
• Responds to the lane the soonest.
• Slowest response to friction. Low Track
• 1. P is the larger circle or pin on the ball that marks the top
of the core.
2. L is a smaller circle or pin that marks Preferential Spin Axis
(PSA / Mass Bias) of the ball
3. For left-handed bowlers use the mirror images of these layouts
• Note: Finger, thumb and X- holes must have at least a moderate bevel
and the riser Pin P must be at least one inch from any drilled hole to
comply with the Brunswick warranty.

• Best pin out distance to use: 0”– 3 ½”
• Locator pin set at 60 degrees Medium Track
• Pin below fingers (VAL angle 70 degrees)
• This layout helps bowlers open up the
mid-lane and recover on heavy carry down
• Responds to the lane soon.
• Slow response to friction. Low Track
• 1. P is the larger circle or pin on the ball that marks the top
of the core.
2. L is a smaller circle or pin that marks Preferential Spin Axis
(PSA / Mass Bias) of the ball
3. For left-handed bowlers use the mirror images of these layouts
• Note: Finger, thumb and X- holes must have at least a moderate bevel
and the riser Pin P must be at least one inch from any drilled hole to
comply with the Brunswick warranty.

• Best pin out distance to use: 3”– 6”
• Locator pin set at 45 degrees Medium Track
• Pin above fingers (VAL angle 30 degrees)
• This layout helps bowlers open up the
mid-lane and recover on heavy carry down
• Responds to the lane late.
• Fast response to friction. Low Track
• 1. P is the larger circle or pin on the ball that marks the top
of the core.
2. L is a smaller circle or pin that marks Preferential Spin Axis
(PSA / Mass Bias) of the ball
3. For left-handed bowlers use the mirror images of these layouts
• Note: Finger, thumb and X- holes must have at least a moderate bevel
and the riser Pin P must be at least one inch from any drilled hole to
comply with the Brunswick warranty.

• Best pin out distance to use: 3”– 6”
• Locator pin set at 70 degrees
• Pin above fingers (VAL angle 30 degrees)
• This layout helps bowlers open up the
mid-lane and recover on heavy carry down
• Responds to the lane the latest.
• Fastest response to friction. Low Track
• 1. P is the larger circle or pin on the ball that marks the top
of the core.
2. L is a smaller circle or pin that marks Preferential Spin Axis
(PSA / Mass Bias) of the ball
3. For left-handed bowlers use the mirror images of these layouts
• Note: Finger, thumb and X- holes must have at least a moderate bevel
and the riser Pin P must be at least one inch from any drilled hole to
comply with the Brunswick warranty.
These layouts are very general and will apply to every bowler differently based on multiple variables. These include the bowlers ball speed, rev rate, axis rotation & tilt, and lane conditions. All or most of these variables should be known so that the best possible layout can be chosen for each ball.
We recommend that you contact your local Pro Shop Professional for more detailed layouts and how to apply them to your game for each ball in your arsenal.

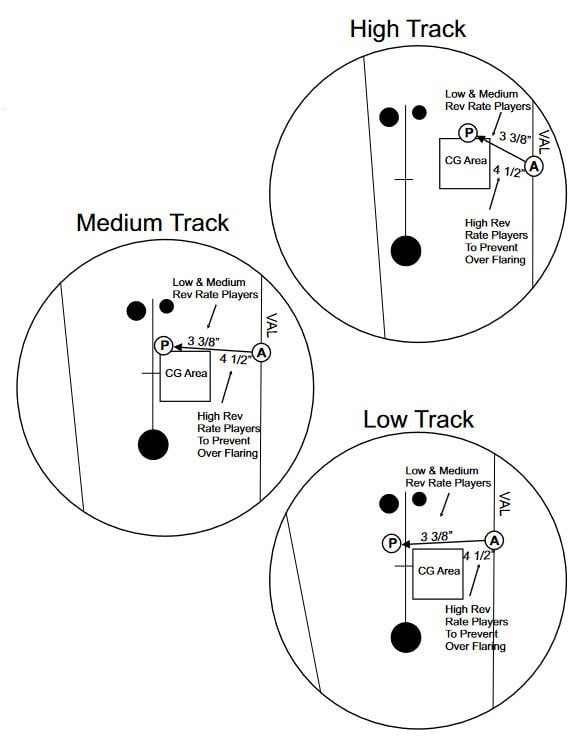
• Best pin out distance to use: 3”– 6”
• This layout will give the bowler maximum hook
with a continuous back-end.
• 1. P is the larger circle or pin on the ball that marks the top
of the core.
2. L is a smaller circle or pin that marks Preferential Spin Axis
(PSA / Mass Bias) of the ball
3. For left-handed bowlers use the mirror images of these layouts
Note: Finger, thumb and X- holes must have at least a moderate bevel
and the riser Pin P must be at least one inch from any drilled hole to
comply with the Brunswick warranty.

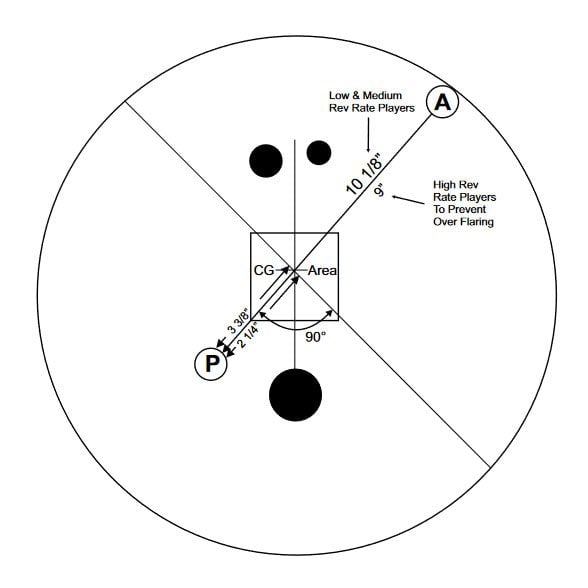
• Best pin out distance to use: 0”–3”
• This layout helps bowlers create length
with a strong back-end
• 1. P is the larger circle or pin on the ball that marks the top
of the core.
2. L is a smaller circle or pin that marks Preferential Spin Axis
(PSA / Mass Bias) of the ball
3. For left-handed bowlers use the mirror images of these layouts
Note: Finger, thumb and X- holes must have at least a moderate bevel and the riser Pin P must be at least one inch from any drilled hole to comply with the Brunswick warranty.
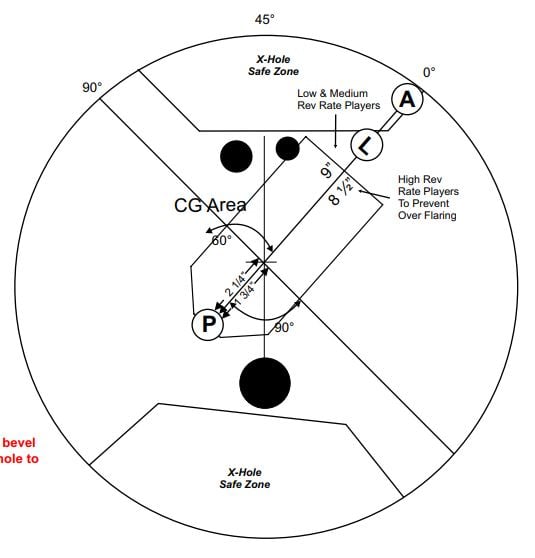
• Best pin out distance to use: 0”– 3”
• This layout helps bowlers create length with
a smooth arcing back-end
• 1. P is the larger circle or pin on the ball that marks the top
of the core.
2. L is a smaller circle or pin that marks Preferential Spin Axis
(PSA / Mass Bias) of the ball
3. For left-handed bowlers use the mirror images of these layouts
Note: Finger, thumb and X- holes must have at least a moderate bevel and the riser Pin P must be at least one inch from any drilled hole to comply with the Brunswick warranty.


These layouts are very general and will apply to every bowler differently based on multiple variables. These include the bowlers ball speed, rev rate, axis rotation & tilt, and lane conditions. All or most of these variables should be known so that the best possible layout can be chosen for each ball.
We recommend that you contact your local Pro Shop Professional for more detailed layouts and how to apply them to your game for each ball in your arsenal.

SWAG Craze Pearl Bowling Ball: Unmatched Versatility for Lighter Oil Conditions The SWAG Craze Pearl [...]
SWAG Craze Solid Bowling Ball: Primary Performance Line Offers Unmatched Control and Versatility The SWAG [...]
SWAG Fusion Bowling Ball: Modern Performance Line Delivers Unmatched Versatility and Control The SWAG Fusion [...]
SWAG Unreal Bowling Ball: Exceptional Versatility and Control for All Bowlers The SWAG Unreal bowling [...]
SWAG Black Dragon Bowling Ball: Unleash Unmatched Power and Control on the Lanes The SWAG [...]
SWAG Judge Bowling Ball: Command the Lanes with Cutting-Edge Technology and Unmatched Aggression The SWAG [...]
Radical Snapshot Bowling Ball: Experience Versatile Performance and a Strong Backend Reaction The Radical Snapshot [...]
Radical Outer Limits Solid: Unleash Unmatched Hook Potential on Heavy Oil The Radical Outer Limits [...]
Ebonite Crusher Hybrid Bowling Ball: Length and Explosive Backend for Maximum Strikes The Ebonite Crusher [...]